Open topic with navigation
Working with Animated Parameters
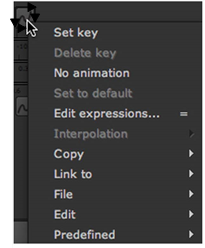
The Animation menu lets you set key frames, delete keys, and perform other editing operations on the curves for animated parameters.
|
|
| The animation menu. |
To Set Keyframes
|
1.
|
Use a Viewer to cue to a frame where you want to place a key. |
|
2.
|
Click the animation button  next to the parameter you want to animate. next to the parameter you want to animate. |
|
3.
|
Select Set key from the dropdown menu. The parameter’s input field turns blue, indicating that a keyframe has been inserted. Nuke enters the autokey mode: when you change the parameters value at another frame, it automatically creates a keyframe for you. |
You can also set a key for all the controls in a node. To do so, select Set key on all knobs from the properties panel right-click menu.
|
4.
|
Cue to the next frame where you want to place a key. |
|
5.
|
Edit the parameter’s value using the input field, regular slider, or color slider. The moment you change the value, Nuke creates a keyframe. |
|
6.
|
Continue adding key frames as necessary. |
|
7.
|
Use the Viewer’s scrubber to preview the result. |
To Delete a Single Keyframe
|
1.
|
Use the Viewer’s next keyframe and previous keyframe buttons  to cue to the keyframe that you want to remove. Notice that the scrub bar indicates key frames with a blue mark. to cue to the keyframe that you want to remove. Notice that the scrub bar indicates key frames with a blue mark. |
|
2.
|
Click the animation button . |
|
3.
|
Select Delete key from the dropdown menu. |
Nuke removes the keyframe.
To Delete All Key Frames from a Parameter
|
1.
|
Click the animation button. |
|
2.
|
Select No animation from the dropdown menu. A confirmation dialog appears. Select Yes. |
Nuke removes all key frames from the parameter, and sets the static value to match that of the current frame.
To Link Animated Parameters with a Tracker Node
You can link any controls with others by using expressions (see the Expressions chapter in the Nuke User Guide), but linking with the Tracker node is even easier than that if you use the Linkto option in the Animation menu. For example to link the translate control of the RotoPaint node with a Tracker node, do the following:
|
1.
|
Create the Tracker node you want to link to. |
|
2.
|
On the Transform tab of the RotoPaint node’s control panel, click on the translate animation menu. |
|
3.
|
Select Linkto > Trackerlinkingdialog |
|
4.
|
Select the Tracker node you want to use in the tracker node dropdown and in the link to dropdown, select whether you want to link to the position of the track or the translate values of it. |
|
5.
|
Select which tracks you want to use by checking the track boxes. The Expression field updates with the appropriate expression syntax. Then click OK, and your linking is done. |
Your Bezier shape’s translate value now changes when the Tracker value is changed.