Importing Cameras from FBX Files
FBX is a standard 3D file format that gives you access to 3D scenes created in other applications supporting the same format. What you generally have in an .fbx file is an entire 3D scene containing cameras, lights, meshes, non-uniform rational B-spline (NURBS) curves, transformation, materials, and so on. From this scene, you can extract cameras, lights, transforms, and meshes into Nuke. This way, you can, for example, create a camera in Maya, export it in a .fbx file, and use the same camera again in Nuke.
Note: For the FBX SDK version used in Nuke, see Third-Party Library Versions.
Tip: If you have trouble with .fbx files, it may be because they were written with an older version of FBX. If they load very slowly, it is also possible that they are ASCII rather than binary. To get around these problems, you can use the FBX converter on the Autodesk website (http://usa.autodesk.com/fbx/download/). It converts between various different formats, including older FBX versions, ASCII, and binary, and is available on Windows, Mac, and Linux.
Importing Cameras from an FBX File
The Camera node lets you read in the standard FBX cameras (Producer Perspective, Producer Top, Producer Bottom, Producer Right, Producer Left, Producer Front, Producer Back) and any other cameras.
Using one Camera node, you can only import one camera from a .fbx file. If you need to import several cameras, you need to use one Camera node per camera.
|
1.
|
Select 3D > Camera to insert a Camera node in the place where you want to add the camera in your script. |
|
2.
|
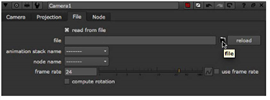
In the Camera controls, check read from file. When this is checked, the controls on the File tab are enabled, and you can use them to read in a camera from an .fbx file. Any controls whose values are read in from the .fbx file are disabled. You can still view these values and use them in expressions but, as long as read from file is checked, you cannot modify them. Modifying the values in the .fbx file, however, affect the disabled values in the Camera controls, because these are reloaded from the .fbx file every time the node is instantiated. |
|
3.
|
To read in a camera from an .fbx file, click the folder icon on the File tab. Navigate to the .fbx file and select Open. |
|
4.
|
From the animation stack dropdown menu, select the take you want to use from the .fbx file. FBX files support multiple takes in one file. Usually, one of the takes is a default take with no animation. |
|
5.
|
From the node name dropdown menu, select the camera node you want to import from the .fbx file. |
|
6.
|
In the frame rate field, define a frame rate (frames per second) to sample the animation curves. To use this rate rather than the one defined in the .fbx file, check use frame rate. |
|
7.
|
To have the camera rotation values calculated using the look up vector and look at position, check compute rotation. If you don’t check this, Nuke uses the rotation channel from the .fbx file instead of computing a new one. The rotation values are always computed when there is a look at target. |
|
8.
|
If you want to modify the camera properties imported from the .fbx file, uncheck read from file on the Camera tab and make the necessary modifications. As long as read from file is unchecked, your changes are kept. |
|
9.
|
To reload the camera properties from the .fbx file, make sure read from file is checked and click the reload button on the File tab. |