Bleeding Across Patch Edges
By default, Mari creates an overspill area at the edge of UV patches to prevent seaming. In some cases, the overspill may not be large enough to prevent seaming artifacts, or you may get render artifacts if your renderer expects a
larger bleed area.
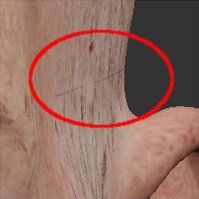
For example, from some angles, Mari's blacksmith tutorial asset shows a seaming artifact in the hair just above the left ear when viewed front on. This is because the bleed for that edge of the UV patch is slightly too small.
|
|
|
| From front on, you can see a slight line at the patch edge. |
This is caused by a too small overspill edge. |
Tip: You can view the overspill bleed by turning on Show UV Patches in the Display Properties dialog box.
If you are experiencing problems with seaming artifacts (either within Mari or after rendering) try conducting a full patch bleed. This extends the bleed area across the entire UV patch.
|
|
|
|
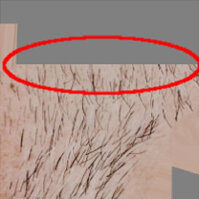
UV patch after full bleed. |
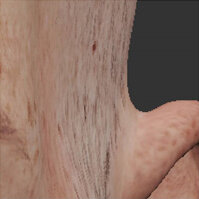
And the artifact is eliminated. |
Note: Mari does not do a full bleed by default because it takes much longer to calculate.
For performance reasons, Mari divides large patches into smaller, more manageable 256x256 tiles. When baking paint into a channel, Mari always performs an individual edge bleed for every tile affected by the paint. The bleed operation fills the tile but does not affect surrounding tiles.
When bleeding is done per tile, some exceptional conditions may occur depending on how the tile lines up with the geometry shell:
• As bleed width is extended from the shell to the tile boundary, it may vary depending how close the shell boundary is to the tile boundary.
• Resizing a patch changes the tile grid causing it to line up differently with the geometry shell, which can affect bleed results.
• Tile corners that just touch the outer shell of the geometry can result in unexpected bleed behavior.
Edge bleeding per patch is different because it renders the entire patch first and then performs a full bleed on it. This avoids the conditions mentioned previously but requires much more memory and processor time, especially when bleeding large patches.
The per tile method is the default behavior and ensures that normal paint-bake operations are performed quickly. Full patch bleeding should only be used in situations where exported tile-bled patches are causing problems in third party applications.
If you see seaming artifacts at the edge of your patches, try doing a full bleed across the affected patches.
| 1. | Select the patches to bleed. |
See Selecting Items for details on selecting patches.
| 2. | From the Patches menu, select Bleed Patch Edges. |
Mari calculates a full bleed for the selected patches, taking the existing textures next to the patch on the model into account. This may take a few seconds.