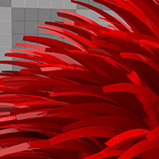
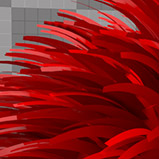
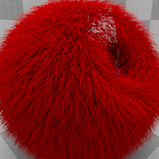
Endless fields of well-manicured lawns, small woodland creatures, shag carpeting, and werewolves - what do these all have in common? They are all possible with Modo's fur material. This flexible texture layer covers surfaces with various fuzzy, frazzled, fluffy, or fibrous fur. The provided functions have a range of creative options. (For example, you can create tame or wild lawns, all manner of fibrous carpeting, little fuzzy animals, or a conifer with pine needles.) Modo renders all of these fibers with amazing speed — even when using global illumination.
To apply fur to a surface, start by adding a Fur Material item to the target surface in the Surface viewport.
NOTE: For information about adding and working with Shader Tree item layers, see the Shader Tree topic. Also, view the Working with Fur topic that provides additional information about using fur in Modo.

Once you add a fur layer, lines now extend from the target object (or surface). These lines may be long or short depending on the object's relative scale. You can't select these lines directly because they're only a rough preview to represent the fibers now growing from the surface. As you make changes in the material properties, these lines update in the viewport to provide feedback about the various parameters. There are many options available in the Properties panel, which are in multiple sub-tabs. In the Fur Material sub-tab, you specify the settings for the fibers' density, size, and shape as well as how they render. In the Fur Guides sub-tab, you adjust the fibers themselves — whether they are curly or straight, or wavy or limp. In the Fur Kink sub-tab, you specify the Frizz and Kink values. You can also control fur with guides that you can style with Modo's painting tools. (See the Working with Fur topic for details.)
The Fur Material sub-tab has general-purpose options that can produce a wide variety of results. Knowing where to start to achieve a particular effect can daunting. Therefore, Modo provides a preset to get you started.
|
Option |
Description |
|---|---|
|
Apply Fur Preset |
Opens a dialog for you to specify options — each of which is a variation on a way to use fur items. The selected preset includes general settings for the fur item, itself, that are specific to the named function. Depending on your use of the fur, you may need to make adjustments to the preset values, which you should consider a starting point to getting the best results for your use. |
|
Random Seed |
Specifies the initial number Modo uses when generating the procedural values. Different Seed values produce different random variations and can be useful in changing the texture result; however, you need to use the same Seed value when you want items to retain the same variations. |
|
Render Density |
Adjusts the density or overall number of fibers on the surface. Increasing this value increases the number of fibers to create a thicker mat. Lower values thins the number of overall fibers. This option only affects the number of fibers that Modo renders. Realize that increased numbers of fibers require more memory to calculate and subsequently take longer to render. |
|
Density VMap |
Specifies an embedded Weight Map on the target fur surface and uses its values to control the density (thickness) of the fur fibers across the surface. Doing this eliminates the need to create custom image maps. You can select any available Weight Map from this list to control the final density of the resulting fur. Weight Map values work as a multiplier over the normal rendered density. A value of 1 produces the unmodified 100% density and fades toward 0 to produce 0% density. |
|
Dimensions |
|
|
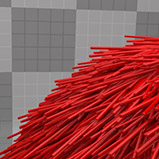
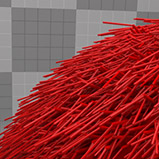
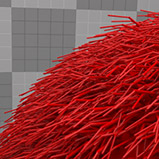
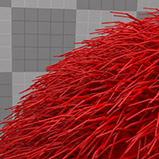
Spacing |
Sets the average space between individual fibers. Smaller values result in thicker, denser fur; larger values result in thinner fur. This setting works with the Width percentage to determine the thickness of the fiber, itself. |
|
Length |
Specifies the overall length of the fibers from the root to the tip. |
|
Length VMap |
Indicates the embedded Weight Map for the target fur surface and uses its values to control the length of the fur fibers across the surface. Using an existing Weight Map eliminates the need to create custom image maps. You can select any available Weight Map from this list. Weight Map values work as a multiplier over the normal rendered length. A value of 1 produces the unmodified 100% length and fades toward 0 to produce a 0% length. |
|
Automatic Sizing |
Sets an initial value for the fur's spacing and length based on the size of the fur surface's bounding box. When you click this button, Modo calculates the size based on 0.5% percent of the maximum extent of surface bounding box (the maximum length of the bounding box's diagonals). The fur length is then 10 times that value. This should only be considered a starting point. |
|
Width |
Specifies the width or thickness of the individual fibers at their root. This is a percentage of the Spacing value. For example, if you have Spacing set to 10 mm and Width set to 10%, then the fibers would be 1 mm wide at the root. With Width set to 50%, the fibers would be 5 mm wide. |
|
Tapering |
Modifies the width of the individual fibers along their length. By using a mini-gradient input, you can modify the width with gradient keys that represent a percentage of the original fiber's width. Click to view examples of various Tapering settings. Much like how a keyframe defines a value in time, gradient keys represent values along a fiber's length for a fiber to thicken and narrow in width any number of times along its length. The gradient input's width represents the individual fiber's overall length with the base on the left side. You can add keys by middle-clicking along the length of the gradient input and then dragging the key icon up or down to adjust the value. The grayscale bar gives visual feedback as to how the values fade from one key to the next. Black produces a fiber at its full, defined width; white tapers the width to 0% (no width); and the shades of gray attenuate the fiber's width in between. Complex tapering input also requires additional geometry for Modo to render it correctly. Therefore, increasing the number of segments and increasing the amount of RAM required to render the scene may be necessary with complex tapering. |
|
Offset |
Pushes the root of each fiber away from the surface by the specified distance. Fibers retain their overall length. |
|
Geometry & Shading |
|
|
Billboards |
Specifies whether to set up billboard polygons by distributing flat polygon planes across a surface. When you map images to the planes, the planes look more complex than their shape suggests. By default, the Billboard setting is Off and has no effect on the fibers. When you select another option, that option provide a one-click setup of popular functions and overrides other settings such as Type and Tapering.
|
|
Type |
Specifies the method Modo uses to generate the fur fibers when Billboards is set to (none). Click to view examples of the two Type options.
|
|
Max Segments |
Smooths fibers. Just as a curved surface requires more polygons to produce a smooth surface, increasing Max Segments produces smoother curves for generated fibers. If you set this value too high, Modo requires more memory and processing time to calculate the fur layer. Generally, you can use fewer segments on fibers that bend only slightly; however, long or curly hair likely requires more segments to produce a smooth result. Click to view examples of various Max Segments settings. |
|
Strip Rotation |
Rotates individual fibers randomly at their root. This option is only effective when you select Type > Strip. Setting a higher value increases the amount of rotation applied (up to 180 degrees at 100%). (You can also change the direction using the Jitter Direction option in the Fur Shape tab. Strip Rotation retains the same bend direction, but Direction Jitter does not.) Click to view examples of various Strip Rotation settings. |
|
View Frustrum Culling |
When enabled, removes the fur outside the view of the camera completely. Overall, this results in faster fur generation time and reduced memory usage. It is especially useful with large, grass-covered landscapes where much grass (or many fibers) are outside of the camera's view. |
|
Adaptive Sampling |
When enabled, decreases the density of a fur layer as it recedes from the camera (based on the Fur Rate). This reduces the overall memory for calculating the layer. To avoid 'popping' as fibers disappear, also enable Automatic Fading. |
|
Fur Rate |
Specifies the threshold that Adaptive Sampling uses to reduce fibers. Modo calculates this as an average distance, in pixels, between two fibers. Use Adaptive Sampling and Fur Rate with scenes such as grassy fields or any situation where large amounts of fibers recede into the distance. |
|
Automatic Fading |
Fades fibers in and out as Modo creates and destroys them based on Adaptive Sampling. This is ideal for animated sequences, but render times increase because semi-transparent geometry takes longer to render. |
|
Remove Base Surface |
When enabled, makes the base polygon invisible (similar to setting the Dissolve Amount to 100%). Normally, fur takes its color and shading information from the surface material from which it grows. For example, you could create a green polygon with green fur growing from it. In this case, you likely want the grass shading to be different from the surface it's attached to. For more information, see the Working with Fur topic. |
|
Use Tangent Shading |
When enabled, rotates the specular shading normal toward the camera to create highlights that run parallel to the fur's direction. This provides a more realistic hair-type highlight. |
|
Use Irradiance Cache |
When enabled, uses irradiance caching instead of the default the Monte Carlo method. For rendering, the irradiance caching options are quite fast, but when rendering fur, they can be quite slow because of the number of curved surfaces in close proximity. Therefore, by default, for fur, Modo uses the Monte Carlo method for calculating global illumination to override the GI settings of the render item. In some special cases, you may want to use irradiance caching instead. |
|
GL Display |
|
|
Display Density |
Affects the number of preview fibers displayed in the 3D Viewport. To speed up the on-screen display, you can view fewer fibers than Modo renders normally. |
|
Set GL Color |
When enabled, uses the GL Color option to set the color for the guide hairs visible in the 3D GL viewport. This is useful in helping to differentiate fibers from other scene elements by visually differentiating them from the rest of the scene. |
|
Tip Color |
Defines a color for each fiber's tip that blends with the Root Color. You can then see the difference between the roots and tips of the fur fibers. |
|
Root Color |
Defines a color for each fiber's root that blends with the Tip Color. You can then see the difference between the roots and tips of the fur fibers. |
|
Bake GL Fur to Guides |
Converts the visible guides within the 3D Viewport into actual polyline guides that you can style and modify by using the brush-based styling tools. Click to covert the guides. |

Linear Taper No Key |
Linear Taper 25% key |
Linear Taper 50% key |
Linear Taper 75% key |
Linear Taper 100% key |
Type Cylinders |
Type Strips |
Segments 1 |
Segments 2 |
Segments 3 |
Segments 4 |
Segments 5 |
Strip Rotation 0% |
Strip Rotation 25% |
Strip Rotation 50% |
Strip Rotation 75% |
Strip Rotation 100% |
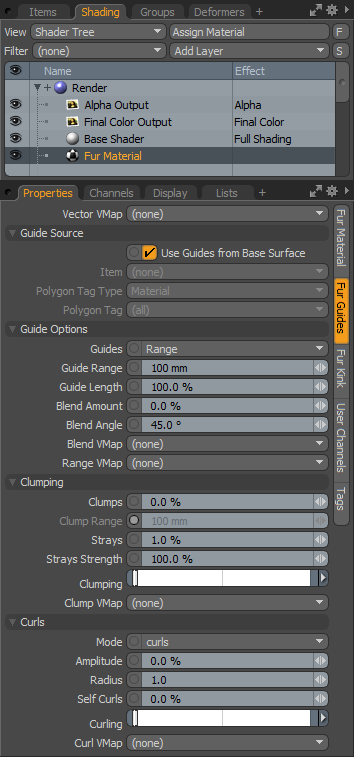
The Fur Guides sub-tab has options for adjusting the fibers themselves. In general, you use guides to adjust the shape of the fur fibers.
Also, on this sub-tab, you can specify guides to control styling (both combing and length) of fur by polygon tag and by object. Therefore, you can separate the guides from the surface on which hairs grow and can have a mesh with just the guides to control the hairs growing on another mesh. You can also tag the guides for each fur layer for more sophisticated hair styling. You can apply tags to guides by selecting the curves in Polygons mode and applying the tags similar to applying a standard polygon tag.
|
Option |
Description |
|---|---|
|
Vector VMap |
Creates a vector-style Vertex Map to style the resulting fur and control both the length and orientation of the fur (as if combed). Vertex maps have benefits over using bitmap-based vector maps in that they become part of the object and, therefore, part of the scene. There is no external file to keep track of, and you can edit them using Modo's tools. Although a vector Vertex Map cannot match the resolution offered by image maps, for most fur-styling tasks, a vector Vertex Map is adequate. To create a vector Vertex Map, click Vector VMap and choose New Map. In the dialog, type a name (or accept the default name) and click OK. With a vector Vertex Map specified, you can use the styling tools to modify the map and control the resulting fur fibers. |
|
Guide Source |
|
|
Use Guides From Base Surface |
When enabled, uses the guides associated with the surface from which the fur is growing (where guides and polygons are sharing a material tag). When disabled, you can specify tagged guides to control the styling for the fur layer. When disabled, the Item, Polygon Tag Type, and Polygon Tag options become available. |
|
Item |
Specifies a guide layer from an available Item (layer) that has guides. This is only available if you disable Use Guides from Base Surface. |
|
Polygon Tag Type |
Specifies one of Modo's polygon tags. (You can define a surface mask based on Modo's polygon tags as given in the Material Group topic. See the Defining Polygon Tags topic for information about creating tags.) This is only available if you disable Use Guides from Base Surface. |
|
Polygon Tag |
Specifies an existing tag name for Modo to use when creating the curves for the fur material. This is only available if you disable Use Guides from Base Surface, and you specify a Polygon Tag Type. |
|
Guide Options |
|
|
Guides |
Determines how guides affect the generated fur material. Guides are the drawn curves (geometry) that Modo uses to style the fur (controlling the length and direction among other attributes). You can create curves for fur in several ways. See the Working with Fur and the Styling Fur topics. The Guides options are:
|
|
Guide Range |
Sets the effective area around the root of the guide where fibers are generated when the Guides type is set to Range. When there is a Guide Range overlap, fibers blend between the two guides based on the blend amount. There is also a small amount of falloff around the Guide Range border. |
|
Guide Length |
Adjusts the length of fur that is generated by guides without needing to edit the guides, themselves. A value of 100% equals the overall guide length; lower values reduce the length by the appropriate percentage. |
|
Blend Amount |
Controls to what degree fibers generated between guides blend between the two positions when the Guide Range setting creates areas of overlapping fibers. |
|
Blend Angle |
Sets the maximum angle between two adjoining guides that create a blend of fibers. |
|
Blend VMap |
Specifies an embedded Weight Map on the target fur surface and uses its values to control the blending of the fur fibers across the surface. This eliminates needing to create custom image maps. You can select any available Weight Maps from this list. Weight Map values work as multipliers over the defined Blend Amount value. Weight values of 1 produce the unmodified, 100% Blend Amount and fade toward 0 to produce no blending of the fibers. Values above 1 (100%) increase the effect. |
|
Range VMap |
Specifies an embedded Weight Map on the target fur surface and uses its values to control the Guide Range amount across the surface. This eliminates needing to create custom image maps. You can select any available Weight Maps from this list. Weight Map values work as multipliers over the defined Guide Range value. Weight values of 1 produce the unmodified, 100% Guide Range and fade toward 0 to produce no blending of the fibers. Values above 1 (100%) increase the effect. |
|
Clumping |
|
|
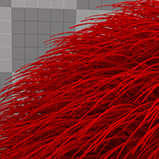
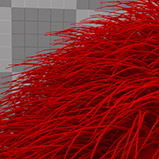
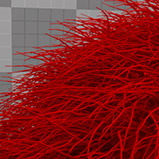
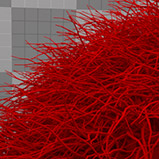
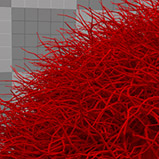
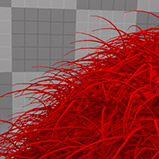
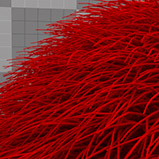
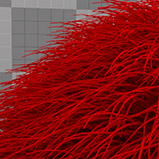
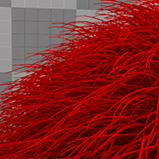
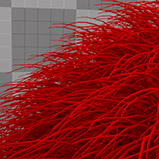
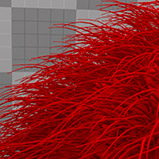
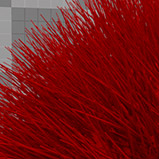
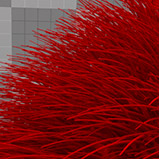
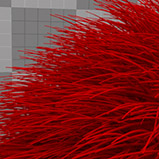
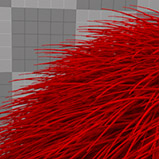
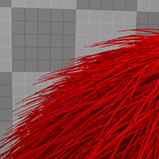
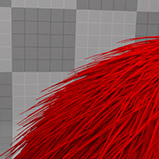
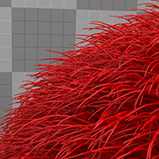
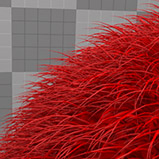
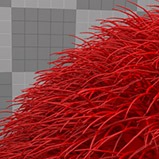
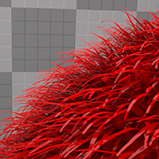
Clumps |
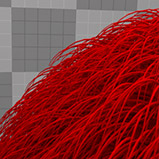
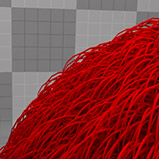
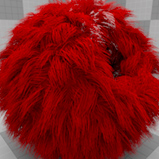
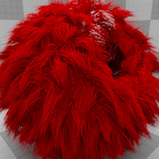
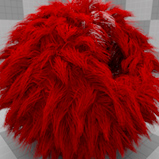
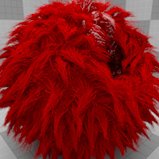
Determines how the fiber tips gather in small groups (clumping). With the guide Type set to Clump, the higher the Clumps value is, the more the tips of fibers tend toward the guides. When there are no guides, the Clump Range setting determines the area of fibers that clump together based on the Clumps setting. Higher values bring the tips into tighter groups; lower values have less of an effect. Click to view examples of various Clumps settings. |
|
Clump Range |
Sets the average range (or area) of fibers that gather together based on the Clumps setting. |
|
Strays |
Randomizes (with a user-specified percentage) the individual fibers to produce a more realistic, random look to fur generated with guides. This option applies to fur with Clumping; otherwise, this setting produces no results. You can specify the number of fibers affected as a percentage of all fibers to define the number of fur fibers that are affected by the Strays Strength value. |
|
Strays Strength |
Determines the amount of randomization applied to the fibers chosen as strays defined as a Perlin noise function that deviates the fiber along its length away from the guide. With Clumps, this value determines the strength a fiber strays away from the clump group. |
|
Clumping |
Influences the clumping amount along the clump's length. Using a mini-gradient input, you can modify the clumping amount with gradient keys that represent a percentage of clumping. Much like how a keyframe defines a value in time, gradient keys represent a clumping amount along the clump's overall length for finer control. The gradient input's width represents the clump's overall length with the base on the left side. You can add keys by middle-clicking along the length of the gradient input and then dragging the key icon up or down to adjust the value. The grayscale bar gives visual feedback as to how the values fade from one key to the next. Black produces no clumps; white produces maximum clumping; and the shades of gray attenuate the clumping in between. Complex clumping input also requires additional geometry for Modo to render it correctly. Therefore, increasing the number of segments and increasing the amount of RAM required to render the scene may be necessary with complex tapering. |
|
Clump VMap |
Specifies an embedded Weight Map on the target fur surface and uses its values to control the Clumps amount across the surface. Doing this eliminates the need to create custom image maps. You can select any available Weight Map from this list to control the clumping of the resulting fur. Weight Map values work as a multiplier over the defined Clumps strength setting. A value of 1 produces the unmodified 100% clumps and fades toward 0 to produce no clumping of the fibers. Values above 1 (100%) increase the effect. |
|
Curls |
|
|
Mode |
Specifies the type of curling for the fur.
• Curls - Produces a corkscrew-like curving to the fibers.
• Waves - Produce an undulating wave-like curving to the fibers. |
|
Amplitude |
Determines the effect of the curls. With smaller values, fibers are only slightly wavy or curly; larger values increase the effect to create stronger curls or waves. To create tight, corkscrew-types curls, set the value greater than 100%. (500% is a good starting point.) Then, make sure there are enough segments on the fiber to support the desired details. |
|
Radius |
Determines the scale of the Curls or Waves. |
|
Self Curls |
Adds an additional amount of curling to the tube-like form created by the initial deformation (for example, curling of the curls or waves). |
|
Curling |
Modulates the curl's strength along the individual fiber's length (acting as a multiplier of the curl's value). Using a mini-gradient input, you can modify the curl's strength with gradient keys that represent the amount of curl. Much like how a keyframe defines a value in time, gradient keys represent the curl strength along the fiber's length for finer control. The gradient input's width represents the length of the fiber with the base on the left side. You can add keys by middle-clicking along the length of the gradient input and then dragging the key icon up or down to adjust the value. The grayscale bar gives visual feedback as to how the values fade from one key to the next. Black produces no curl; white produces maximum curling (based on the curl's value); and the shades of gray attenuate the curling in between. Curling is a multiplier of the curl's amount that requires a value above 0 before Curling produces results. Curling creates complex fiber twisting that requires additional geometry for Modo to render it correctly. Therefore, increasing the number of segments and increasing the amount of RAM required to render the scene may be necessary with complex tapering. |
|
Curl VMap |
Specifies an embedded Weight Map on the target fur surface and uses its values to control the curls' Amplitude amount across the surface. Doing this eliminates the need to create custom image maps. You can select any available Weight Map from this list to control the clumping of the resulting fur. Weight Map values work as a multiplier over the defined Amplitude strength setting. A value of 1 produces the unmodified 100% amplitude and fades toward 0 to produce no curling of the fibers. Values above 1 (100%) increase the effect. |
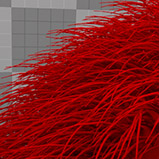
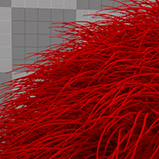
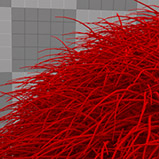
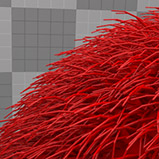
Fur Clumps 0% |
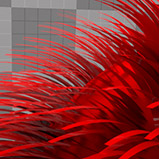
Fur Clumps 25% |
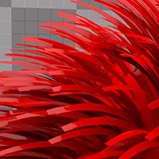
Fur Clumps 50% |
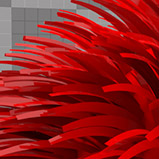
Fur Clumps 75% |
Fur Clumps 100% |
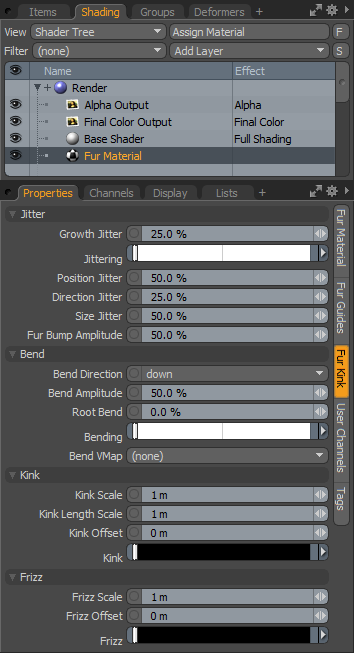
Based on a noise modifier, the Kink effect applies a chaotic twisting to the individual fibers to make them look tangled. The detail introduced is dependent on the number of segments in the fiber. A greater number of segments produce more detailed results, but more segments also require additional memory and time to render. To produce a result, there must be some value of Kink along the gradient.
The Frizz effect applies a somewhat random waviness to the individual fibers to making them look messy. The detail introduced is dependent on the number of segments in the fiber. A greater number of segments produce more detailed results, but more segments also require additional memory and time to render. To produce a result, there must be some value of Frizz along the gradient.
|
Option |
Description |
|---|---|
|
Jitter |
|
|
Growth Jitter |
Increases the randomness of a fiber along its length. A setting of 0% produces straight fibers; increasing values produce more jagged and random fibers. Click to view examples of various Growth Jitter settings. |
|
Jittering |
Modulates the jitter strength along the individual fibers length (acting as a multiplier of the Growth Jitter value). Using a mini-gradient input, you can modify the jittering strength with gradient keys that represent the amount of jittering. Much like how a keyframe defines a value in time, gradient keys represent the jittering strength along the fiber's length for finer control. The gradient input's width represents the length of the fiber with the base on the left side. You can add keys by middle-clicking along the length of the gradient input and then dragging the key icon up or down to adjust the value. The grayscale bar gives visual feedback as to how the values fade from one key to the next. Black produces no jittering; white produces maximum jittering (based on the Growth Jitter value); and the shades of gray attenuate the jittering in between. Jittering creates complex fiber twisting that requires additional geometry for Modo to render it correctly. Therefore, increasing the number of segments and increasing the amount of RAM required to render the scene may be necessary with complex tapering. Additionally, because Jittering is a multiplier of the Growth Jitter amount, a value above 0 is necessary before Jittering produces results. |
|
Position Jitter |
Increases the randomness of the root positions of fibers. When creating multi-layered fur, subsequent fiber layers grow from identical positions. If this is not the intended result, you can increase the Position Jitter value to eliminate the overlap. |
|
Direction Jitter |
Randomizes the angle of rotation for the root of a fiber. This is similar to Strip Rotation on the Fur Material sub-tab; however, Direction Jitter also randomizes a fiber's bend direction. A setting of 0% produces fibers in a uniform direction. Values greater than 0% increase the randomness of rotations for each fiber. Click to view examples of various Direction Jitter settings. |
|
Size Jitter |
Randomizes the overall scale of each fiber. A setting of 0% produce fibers of equal size; values greater than 0% increase the random scaling of fibers. Click to view examples of various Size Jitter settings. |
|
Fur Bump Amplitude |
Controls the strength of influence a texture layer assigned to the Fur Bump layer effect has over the Root Bend and Bend Direction values of the fur effectively to control the growth direction. This is similar in function to the Fur Direction controller used for combing fur; however, a Fur Bump layer can be an arbitrary image map or a procedural texture to control the direction much like a bump map perturbs the surface rays and simulates bumpy surfaces. |
|
Bend |
|
|
Bend Direction |
Controls the bending orientation of individual fibers.
|
|
Bend Amplitude |
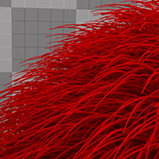
Adds bending or drooping to individual fibers as if they were affected by gravity. For fibers growing straight up (such as grass), a value of 0% produces perfectly straight fibers, and setting of 100% produces a fiber tip that is bent 180° from its root. Fibers growing downward are less affected by this setting. To produce smooth bend results, you may need to increase the number of Segments. Click to view examples of various Bend Amplitude settings. |
|
Root Bend |
Determines the direction of a fiber. With a value of 0%, a fiber's root direction is based on the direction of the corresponding smoothed polygon's normal. (Whatever direction the polygon is facing, the fiber grows from that surface in the same direction.) Increasing this value rotates the root to alter the fiber's growth direction. A setting of 100% produces a fiber that grows perpendicular to the normal (a rotation of 90 degrees from the surface). Click to view examples of various Root Bend settings. |
|
Bending |
Modulates the Bend Amplitude along the individual fiber's length (acting as a multiplier of the Bend Amplitude value). Using a mini-gradient input, you can modify the bending strength with gradient keys that represent the amount of Bending. Much like how a keyframe defines a value in time, gradient keys represent the bend strength along the fiber's length for finer control. The gradient input's width represents the length of the fiber with the base on the left side. You can add keys by middle-clicking along the length of the gradient input and then dragging the key icon up or down to adjust the value. The grayscale bar gives visual feedback as to how the values fade from one key to the next. Black produces no bending; white produces maximum bending (based on the Bend Amplitude value); and the shades of gray attenuate the bending in between. Additionally, because Bending is a multiplier of the Bend Amplitude amount, a value above 0 is necessary before Bending produces results. |
|
Bend VMap |
Specifies an embedded Weight Map on the target fur surface and uses its values to control the bend strength across the surface. Doing this eliminates the need to create custom image maps. You can select any available Weight Map from this list to control the clumping of the resulting fur. Weight Map values work as a multiplier over the defined Bend Amplitude setting. A value of 1 produces the unmodified 100% bending amount and fades toward 0 to produce no bending of the fibers. Values above 1 (100%) increase the effect. |
|
Kink |
|
|
Kink Scale |
Determines the size of the noise that produces the kinks. Smaller values have a more dramatic tangled look, and larger values look less tangled. |
|
Kink Length Scale |
Determines the scale of the kink along the length of the individual fiber. Large values create fibers that look more like waves. |
|
Kink Offset |
Re-positions the noise generator for the kinks. When animated, you can use this option, for example, to simulate a grass field blowing in the wind. |
|
Kink |
Modulates the kink amount along the individual fiber's length. Using a mini-gradient input, you can modify the amount with gradient keys. Much like how a keyframe defines a value in time, gradient keys represent the kink amount along the fiber's length for finer control. The gradient input's width represents the length of the fiber with the base on the left side. You can add keys by middle-clicking along the length of the gradient input and then dragging the key icon up or down to adjust the value. The grayscale bar gives visual feedback as to how the values fade from one key to the next. Black produces no kink; white produces a maximum kink (based on the Kink Scale, Kink Length Scale, and Kink Offset values); and the shades of gray attenuate the kinking in between. The Kink effect creates complex fiber twisting that requires additional geometry for Modo to render it correctly. Therefore, increasing the number of segments and increasing the amount of RAM required to render the scene may be necessary with complex tapering. |
|
Frizz |
|
|
Frizz Scale |
Determines the size of the waviness applied to the fibers. Smaller values produce finer waves; larger values increase the size of the waves. |
|
Frizz Offset |
Re-positions the noise generator for the frizz. When animated, you can use this option, for example, to simulate a grass field blowing in the wind. |
|
Frizz |
Modulates the frizz amount along the individual fiber's length. Using a mini-gradient input, you can modify the amount with gradient keys. Much like how a keyframe defines a value in time, gradient keys represent the frizz amount along the fiber's length for finer control. The gradient input's width represents the length of the fiber with the base on the left side. You can add keys by middle-clicking along the length of the gradient input and then dragging the key icon up or down to adjust the value. The grayscale bar gives visual feedback as to how the values fade from one key to the next. Black produces no frizz; white produces a maximum frizz (based on the Frizz Scale and Frizz Offset values); and the shades of gray attenuate the frizziness in between. The Frizz effect creates complex fiber twisting that requires additional geometry for Modo to render it correctly. Therefore, increasing the number of segments and increasing the amount of RAM required to render the scene may be necessary with complex tapering. |
|
Growth Jitter 0% |
Growth Jitter 25% |
Growth Jitter 50% |
Growth Jitter 75% |
Growth Jitter 100% |
|
Direction Jitter 0% |
Direction Jitter 25% |
Direction Jitter 50% |
Direction Jitter 75% |
Direction Jitter 100% |
|
Size Jitter 0% |
Size Jitter 25% |
Size Jitter 50% |
Size Jitter 75% |
Size Jitter 100% |
|
Bend Amplitude 0% |
Bend Amplitude 25% |
Bend Amplitude 50% |
Bend Amplitude 75% |
Bend Amplitude 100% |
|
Root Bend 0% |
Root Bend 25% |
Root Bend 50% |
Root Bend 75% |
Root Bend 100% |