Open topic with navigation
Adding Motion Blur Using VectorBlur
Nuke’s VectorBlur node generates motion blur by blurring each pixel into a straight line, using the values from the motion vector channels (u and v channels) to determine the direction of the blur. Compared to generating motion blur using the ScanlineRender node’s MultiSample controls, this is less accurate but faster to render.
You can create the necessary motion vectors for use with VectorBlur in several ways:
• Use the ScanlineRender node. This is usually more accurate than using a MotionBlur3D node (described below), and works well with both static and moving cameras as well as both linear and non-linear camera movement. See To use VectorBlur with ScanlineRender.
• Alternatively, if your 3D scene is static or nearly so and the camera movement over the shutter time is nearly linear, you can also use the Filter > MotionBlur3D node. However, note that MotionBlur3D only uses camera information to produce motion vectors. If you have moving objects in your scene but the camera is static, MotionBlur3D isn’t able to produce any output. See To use VectorBlur with MotionBlur3D.
• Several third-party 3D applications can also produce motion vector information as two-channel, floating point images that you can use with VectorBlur. If possible, you should unpremultiply these images. See To use VectorBlur with Third-Party Motion Vectors.
To use VectorBlur with ScanlineRender
|
1.
|
In your 3D scene, open the ScanlineRender properties and go to the Shader tab. |
|
2.
|
Make sure motion vectors is set to one of the following (not off): |
• classic - Render motion vectors the classic (pre-Nuke 6.1) way. This option is only provided for backwards compatibility, and isn't always accurate.
• velocity - Store the velocity of every single pixel in the motion vector channels (pre-Nuke 7.0 way). This option is only provided for backwards compatibility. In order to have the same behavior as Nuke 6.3, set samples to 1.
• distance - For every pixel, store the distance (in pixels) between samples in the motion vector channels. This is the recommended option that usually produces the best results. It also allows the VectorBlur node to produce curved vector blur where interpolation between two frames is made according to a curve rather than linearly.
|
3.
|
Use motion vector channels to select where to store the generated motion vectors. |
If you view the channels you selected, you should see they now contain motion vectors.
|

|
|
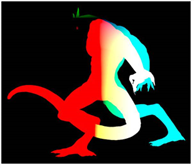
| A render of a 3D scene. |
Motion vectors produced by
ScanlineRender. |
|
4.
|
On the MultiSample tab, leave samples set to 1. You can increase this value later if non-linear movement cannot be approximated sufficiently well using VectorBlur’s linear approach. |
|
5.
|
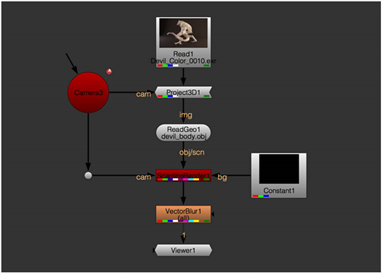
Select Filter > VectorBlur to insert a VectorBlur node after ScanlineRender. |
|
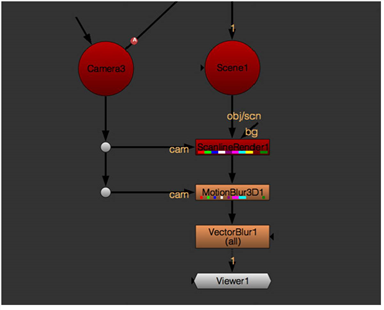
|
| A node tree with ScanlineRender and VectorBlur. |
|
6.
|
In the VectorBlur properties, use the channels dropdown menu to select the channels to blur. |
|
7.
|
Select the motion vector channels from the uv channels dropdown menu. These should be the same channels as the channels you chose to create in step 3. |
|
8.
|
For improved results, set method to forward. This is a more accurate algorithm than backward, but also takes longer to render. |
The backward algorithm is only correct if the motion vectors are continuous, with no abrupt changes at the edge of objects.
|
|
|
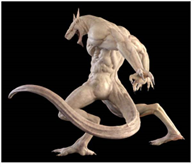
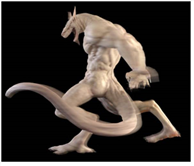
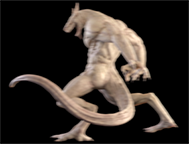
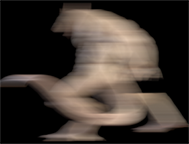
| The original image. |
Motion blur produced by
VectorBlur. |
|
9.
|
Set offset to 0. This means the shutter opens at the current frame. |
|
10.
|
To adjust the length of the blur, adjust the shutter control on the MultiSample tab of the ScanlineRender properties. |
To use VectorBlur with MotionBlur3D
|
1.
|
In your 3D scene (which should be static or nearly static), open the ScanlineRender properties, go to the Shader tab, and set motion vectors to off. |
This tells ScanlineRender not to produce motion vectors, which is what you want if you are going to use MotionBlur3D to generate the vectors.
|
2.
|
Select Filter > MotionBlur3D to insert this node and connect it to the ScanlineRender node’s output. |
|
3.
|
Connect the rendering camera to the cam input of the MotionBlur3D node. Note that this has to be a moving camera. The camera movement over the shutter time should be linear or nearly linear. |
|
4.
|
In the MotionBlur3D properties, use Output UV to select where to store the generated motion vectors. |
If you view the channels you selected, you should see they now contain motion vectors.
|
5.
|
Select Filter > VectorBlur to insert this node and connect it to the MotionBlur3D node. |
|
|
| A node tree with MotionBlur3D and VectorBlur. |
|
6.
|
In the VectorBlur properties, select the motion layer from the uv channels dropdown menu. |
|
7.
|
For the add settings, enter 1 for both u and v. |
NOTE: For anamorphic footage, the add u value should be 2 and the add v value should be 1.
|
8.
|
For improved results, set method to forward. This is a more accurate algorithm than backward, but also takes longer to render. |
The backward algorithm is only correct if the motion vectors are continuous, with no abrupt changes at the edge of objects.
|
9.
|
To adjust the length of the blur, adjust the Shutter setting in the MotionBlur3D properties panel. |
|
|
|
| Low Shutter value. |
High Shutter value. |
To use VectorBlur with Third-Party Motion Vectors
|
1.
|
Select Filter > VectorBlur to insert a VectorBlur node after a 2D image that contains motion vector channels. |
|
2.
|
In the VectorBlur properties, use the channels dropdown menu to select the channels to blur. |
|
3.
|
Select the motion vector channels from the uv channels dropdown menu. |
|
4.
|
If your motion vectors have been premultiplied by the alpha channel, check alpha. |
|
5.
|
For improved results, set method to forward. This is a more accurate algorithm than backward, but also takes longer to render. |
The backward algorithm is only correct if the motion vectors are continuous, with no abrupt changes at the edge of objects.